Model Based UI Testing using DGML
Transcript: In this video I’m going to explain how to use the DgmlTestMonitor that I published to the Visual Studio Gallery.
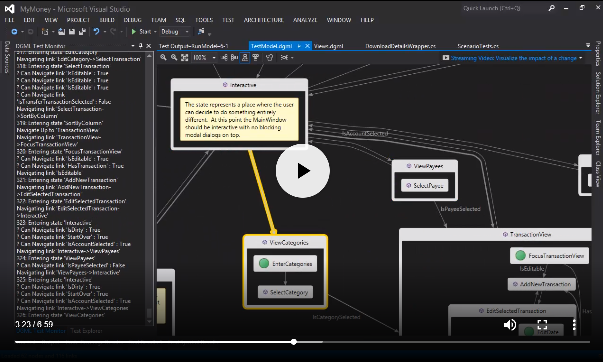
I’ve got a test project loaded here with some test methods and I have a DGML document. The Directed Graph Markup Language is supported by Visual Studio 2012 and it allows me to edit these diagrams. I created this diagram to model the user interface of an application that I’m testing. Not only that, I have a way of executing this model and even setting breakpoints using the DgmlTestMonitor which you will find under View/Other Windows.
Now I can come in here and set a breakpoint on this node. So whenever it gets into editing transactions and editing categories the model will stop executing. Alright, so let’s run the test. Notice I don’t actually have to debug the test to get these breakpoints.
1:00: This is the application that I’m testing, it’s a simple financial management tool that allows me to create bank accounts and transactions and so forth, and right there it has edited a category and so the model has paused. So let’s go back to the application and we see it sitting on that node and if we look at the DgmlTestMonitor output we can see everything that it has done up until that point. I can even select through here and watch what it did up until that point.
1:30: If you put Visual Studio on another monitor you will be able to watch the model executing while it’s actually testing the application. Now that’s it’s reached this point I’m going to move the application to another monitor. Now we can watch the model executing. Maybe I want to stop it when it adds a transfer. I’ll clear the previous breakpoint, tell it to resume, and off it goes. So the UI test is continuing, it’s doing various different steps. Since I can watch the model executing I can get a feel for whether this is accurately modeling and end-user or not and I can edit the model, I can add links, I can add nodes and I can make the test do different things.
2:15: Now in this case we hit a test bug because if we switch to the Test Explorer we see the test terminated when it was trying to set the date on a transaction. Now it turns out this is a product bug, sometimes setting the date is a little flakey. This is the kind of thing that model based testing is really good at, finding edge conditions that are really hard to find any other way, which is why I’m a big fan of model based testing. I’m not saying this is going to replace all static testing, but I think this is a very interesting thing to add to your suite of test tools.
2:45: Alright, a lot of magic to explain here. How does this actually work? Let’s take a look at the test code. The way you do this is with in normal MSTest [TestMethod] you create a new DgmlTestModel , you give it the filename of the DGML document that you want to load and then you tell the model to run until you’re happy. I’ve provided a Predicate that says run until 500 states have been executed.
All right, now you pass in an object to the DgmlTestModel constructor which is the target object that implements the states - so the test model is connected to my code. If I double click this node it will take me to that method and this is the implementation of editing a category. Notice that there’s lots of random number generation going on, some keystrokes to tab through various fields until it finds the category and so on.
3:43: This framework doesn’t change how you build test wrappers, you could use the CodedUI, I created these wrappers so I could automate, using System.Automation, the user interface of my application. What’s new here is the way you can actually visually define the states that you want to travel through and the links that connect the states. So when I edit a category I can go over here or I can go down there and the test model execution decides randomly which of these paths to take that have multiple choices.
4:15: When you create a group you can encapsulate the complexity of editing transactions and you can define an entrypoint, so a node that has the EntryPoint Category which you can define using the property window, you can add the entry points. You can also have entry points that are mutually exclusive, so if you choose this one, don’t choose that one and so that has a category on it saying it is a singleton. You can define predicates on a link, so you can add link labels “IsSecuritySelected” we see that’s just a implemented as a Boolean property. You can implement all kinds of state machinery in your Boolean properties which will then guide the test in the right way. For example, IsAccountSelected, or IsEditable and so forth. So all of these things can encode various state about what your application is doing to make sure your test model doesn’t get stuck in a weird state and try to do something that’s invalid.
5:16: Now since it is random, you’ll want to also be able to reproduce a failure and if you scroll to the bottom of the test output and you will see the “Model Seed = 3122235”. This number is the seed to the random number generator. If I plug this number in I will get the exactly the same test sequence that I got before. So basically you can create a static test by just copying down these seeds, which is a pretty low maintenance way of creating static regression tests.
5:43: Ok, let’s edit this model and see if we can make some changes here. So when we edit the payee we can go to SalesTax, or Deposit or Payment. Well maybe I always want to have salestax, so I just delete those links and maybe I want to have the memo field be optional, so instead of always going from EditCategory to EditMemo, I’ll give it one more route from there to SelectTransaction and now I will only have EditMemo sometimes. That’s it, that’s all you have to do, save the document and re-run the test. Ok, we see it now adding a new transaction, that time it added a memo, this time it didn’t, this time it did, and now it added a transfer and it stopped, so let’s see what happened.
6:43: Ah, that’s because we have a breakpoint on AddTransfer, remember? So I can go to the DgmlTestMonitor and we can see that it hit a breakpoint on that node and I can tell it to resume running the test. You can also pause the test at any time, using the pause button, which is handy for a UI test because often interrupting a UI test is kind of tricky but when you tell the model to pause it’s usually in a pretty good place.
7:18: Alright, so, one more thing and that is you can modify the thickness of these links. If you go to the Property Window this link has a priority of 10 which means it’s going to pick that link more often than this link with Priority 1. This way you can weight the model so that it’s doing various things in a way that’s similar to the way a real user would use your product.
7:40: Lastly, when the model enters a group, like View Categories, notice there’s no exit links from SelectCategory. Just to make it simple to create these models what happens when it hits a leaf node that has no exit, it will jump back up to the parent group and it will use any exit links that the parent has, and if the parent doesn’t have any exit links then it will go back to the root and look for an entry point there, and re-entry the model at the root and keep executing from there. So that makes it easy, you don’t have to specify all possible exit routes and it makes your model a little bit simpler.
8:18: That’s it! I hope you like it. I’ve posted a blog on my website, and in there you’ll see a readme that points to the source code that you can download so you can play with it, including sample code on how to wire it up and also documentation on this class, DgmlTestModel. You will find DgmlTestModel and also the NamedPipeReader that listens to the model while it’s executing in case you want to build your own user interface.
Thanks for watching!